
Receiving five MaimeriBlu watercolour paints from the SAA to trial was akin to uncovering five secret ingredients to cook a meal. I quickly settled on this pheasant with his striking reds, browns and blues, using wet-in-wet and wet-on-dry techniques and tonal counterchange; painting dark against light and light against dark to create form
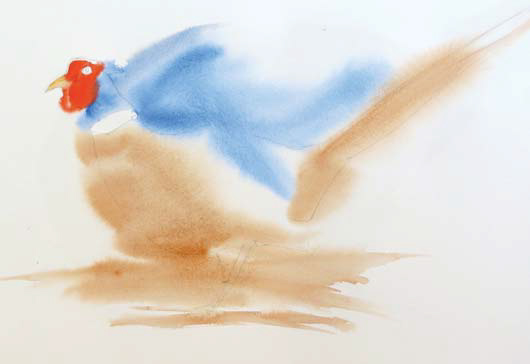 Mix up plenty of each of your washes before you get started, especially when working wet-in-wet. Make a light pencil sketch of the pheasant before liberally applying a quick underlying wash of clean water – cover the whole pheasant with water (leaving the eye and collar dry), and then add water above the pheasant between the head and the tail feathers (don’t take the water out to the edge of the paper). Add a curve of water under the body and down the legs, sweeping the brush across the ground area a few times. Now for the fun bit! Start to apply washes that are not too concentrated in areas all across the wet paper; Cobalt Blue Light above the back of the pheasant and on the neck, Burnt Sienna in the body area and finally Cadmium Red for the head (and a small bit of Cadmium Yellow for the beak). Don’t worry about the colours running, merging together and spreading outside the body of the pheasant – this first wash is just to establish rough shapes and the blending of the subject with the background will unify the painting. Leave to dry thoroughly.
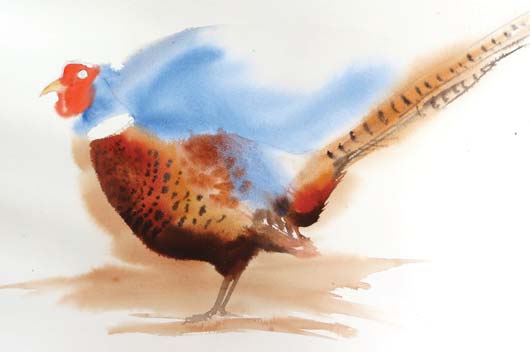 Loosely cover the head and neck with a clean piece of kitchen towel and lightly spray a fine mist of clean water over the first dry wash on the pheasant and background. This will retain a softness to the outer edges with the second wash. You can now start to use the principle of tonal counter-change. Apply a fairly concentrated Burnt Sienna wash to the left edge of the chest and merge this with Burnt Umber to the bottom side of the pheasant. This will give a dark edge against a light background. Whilst the paint is still wet on the paper, add water to the wash and allow the colours to flow towards the top of the pheasant, making the top of the bird paler than the bottom. Leave some underlying blue on the body of the pheasant untouched by the second wash to indicate lighter feathers. Using the number 10 brush and a pale Burnt Sienna wash, lightly apply a stroke of paint in the middle and along the length of the tail feathers. Whilst this is still wet use the Rigger loaded with a mixture of Cobalt Blue and Burnt Umber to paint vertical stripes along the length of the tail and some spots across the chest and wings of the body then allow to dry.
 Turn the painting upside down, giving you access to the paper above the pheasant without having to lean across the painting. Mix a medium consistency wash of the Cobalt Blue pigment and paint around the top edge of the pheasant. Add clean plain water to the top of the wash and encourage it away from the body but stop within the boundaries of the previous wash. Once again, leave this to dry.
 Now for the head, start with the eye, painting the pupil in Burnt Umber (with a hint of Cobalt Blue added to the wash). Leave a small highlight of white/pale paper, if you can. With the Rigger brush, paint a small line around the outside of the eye and around the area under the beak. Mix up a more concentrated wash of Cadmium Red and apply to the middle of the wattle – with the Rigger, add a few small spots of Burnt Umber to this wash as it is drying. Mix Cobalt Blue and a small amount of Cadmium Yellow and, similarly to the bottom edge of the pheasant, apply the wash to the left side of the neck, then add a small amount of water to the edge to allow the paint to flow into the paler section on the right side of the neck. Paint the blue feathers at the back of the head with Cobalt Blue and add a very pale blue wash on the left side of the collar to add a rounded look to the neck.
 For the finishing touches add an extra wash of Cadmium Yellow to the mid-body feathers to build up the intensity of colour, then with the Rigger brush add a small amount of detail to some of the feathers and a few fine lines using Burnt Umber and Cobalt Blue – not too many, one under the right side of the collar and a few dark lines in the feathers. I must admit, I did use a tiny bit of Titanium White for a few accent marks. I loved the rich intensity of these Italian paints which retained a good depth of colour when dry and the washes mixed well. I am tempted to try more colours from their sumptuous colour range and would thoroughly recommend further studies with these gorgeous paints.
Kaye offers online watercolour tuition via her website
www.kayeparmenter.co.uk
and welcomes any questions you may have on this demonstration. Please email
info@kayeparmenter.co.uk