
 To begin I masked the horizon approximately a third down from the top and sketched a rough outline of the headland in paint. Next I applied Cadmium Orange to the sky using a size 16 flat oil brush. Using a clean brush I then applied a mix of French Ultramarine and White, blending the edges of the Orange and the Blue together with the same brush leaving no unpainted canvas in the sky area. The darker clouds were a mix of Orange, Blue and White which were gently stippled onto the sky using the size 16 flat and 1.5cm flat. I completed this stage by blending the different areas with a soft fan brush to soften any edges.
 Using the size 16 flat and 1.5cm flat, I painted the misty, distant headland using a similar colour mix to that used for the dark clouds, made slightly darker by adding a little more Blue and Orange and a little less White. I added the highlights on the distant headland with the same brushed by scrubbing in some Orange and wiping it back with the bristles of the brush. Using the same brushes I added the closer rocks with a mix of Raw Umber, Orange and Blue. Once again I scraped back the paint to give the highlight (a soft cloth can be used for this).
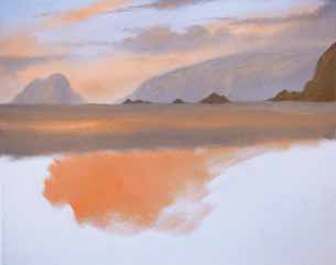 I removed the masking tape then, with a mix of Orange, Blue and White, I carefully painted along the horizon using a 1.5cm flat brush and applied some Orange to the water to show the reflection of the sky using the size 16 flat. The bright Orange area in the foreground will create the transparent wave. Again, I blended these areas with my fan brush.
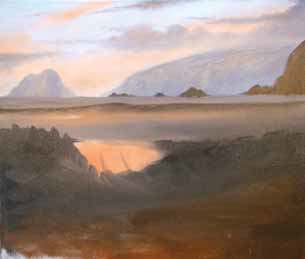 With the size 16 flat, I scrubbed a mix of Orange, Blue and Raw Umber into the foreground and also applied this same colour to the distant wave cutting across the bay, before blending it all with the fan brush and leaving it to dry. Conventional oils will take between two and four days to dry depending on atmospheric conditions. Watermixable oils will take a bit longer to dry than conventional oils and if you are using acrylic these will be dry after about half an hour.
 Once the painting was completely dry it was ready for the next stage. The foam colour was mixed using Blue and White with a tiny bit of Orange, thinned with Liquin Original. I used a round size 0 to apply the foam to the distant rocks then, using a clean dry brush (the size 16 flat) I moved the paint around to create the spray. A worn, stumpy brush is also good for this as it moves the paint around nicely. The distant foam colour was thinned to the consistency of ink with Liquin Original because I didn’t want the colour too strong at that distance. I applied the mid ground foam using the round size 0 and 1.5cm flat, which have soft bristles and apply the paint well. The highlights on the foam were a mix of Orange and White.
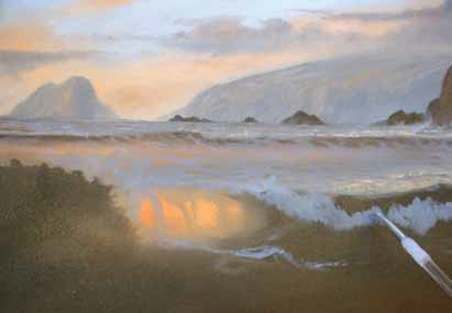 The foreground foam is the same colour as the background foam with a little less Liquin as this needed to be a stronger colour. I painted the highlights on the foam with a mix of Orange and White using the 1.5cm flat. The foam was applied by stippling the colour onto the wave where it’s breaking, using horizontal strokes leaving little oval shapes of the background colour to represent where the foam is breaking up. The misty spray on the tops of the waves was created by moving the wet paint in a windswept effect using the size 16 flat.
 Just below the bright orange area in the transparent wave I added an area where the water is pouring over a small rock, covering it completely with foam to add some interest. To paint the wet sand in the foreground I scrubbed on a very thin coat of an Orange and Raw Umber mix using the size 16 flat, then painted a mix of Blue and White over the bottom left foreground. I used the 1.5cm flat to paint the rock on the left using a mix of Raw Umber, Blue and Orange, applying this rock colour very thinly as I wanted to paint on top of it when it was still wet – if the paint is too thick it won’t take another colour. The highlights on the top left of the rock are a mix of Orange and White and were painted using the 1.5cm flat.
Again using the 1.5cm flat, I created the wet look on the dark side of the rock with a mix of Blue and White, which mixes with the wet paint of the rock underneath to give the right effect. With the round size 0 I added some finer veins of shadowed foam onto the bright Orange transparent wave in a mix of Orange, Blue and White thinned with Liquin. The puddles were painted with an Orange and White mix using the 1.5cm flat. The dark reflections in the puddles are a mix of Raw Umber and Blue. After these were applied I pulled these reflections down with a soft fan brush. Highlights and misty spray were added as finishing touches.
If you’d like to see more from Alan Kingwell, you can do so by visiting his website.