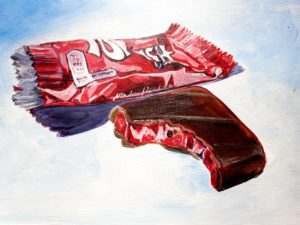
What, there is a day dedicated to Chocolate!? Just one day!
Evidence of a fermented drink made from chocolate have been found to date back as early as 1400BC, although this was bitter and sometimes mixed with spices or corn puree. The name Chocolate can trace the origins of the name to Aztec word Xocoatl which referred to a bitter drink brewed from cacao beans. Mayans used it in official ceremonies and religious ritual official ceremonies and religious rituals, at feasts and festivals, as funerary offerings, as tribute, and for medicinal purposes.
In was not until the 16th century when Chocolate was introduced in Europe, sugar was added, and it became a popular beverage. I am a dark chocolate fan myself but after reading that it was Joseph Fry in 1847 who discovered that he could make a moldable chocolate into a chocolate bar then this was the inspiration for the subject of the painting.
By 1868 Cadburys have started making little chocolates. The Fry’s Turkish Delight is now made by Cadbury but was originally launched in the UK in 1914 by the Bristol chocolate manufacturer J. S. Fry & Sons. Cadbury retained the Fry identity when the company merged with Cadbury in 1919 and the rest is history.
I tend to use my own images so they do not contravene copyright issues – keeping to this mantra I had to purchase a couple of bars of chocolate to be able to complete this painting.
Acrylics are wonderfully versatile and can be used on many surfaces. On porous surfaces they adhere well and create a permanent bond, waterproof when dry they are perfect for all types of creative endeavours, from wood, to stone, paper, canvas – anything which is neither greasy nor too glossy.
The Winsor and Newton Starter Set is and artist quality acrylic which has a good range of basic colours, it offers all I need and more for a painting. I would usually use an SAA Acrylic Keep-Wet Palette when working with the fast-drying acrylic paints, as it keeps the acrylics moist and workable for days even a week. I did not have one with me, so I did find it a struggle with the acrylics and how fast they dried, I only use a little of the colour at a time. Being artist quality with a higher pigment load this was fine as a little went a long way.
Acrylics can be applied with many tools and in different ways from thick texture (impasto work) to thin glazing and layering. If there is an area which has not worked, simply go over it.
For the painting of the Fry’s Turkish Delight I took lots of photos from different angles and at different stages of the disappearing chocolate.
At the time I did not know which image I was going to uses so it is useful to take plenty. With modern technology it is easy to reject ones that do not work and crop and alter those which work better. I also have the original product in front of me to work from (admittedly not for long). I looked for a good composition which showed both the shiny, colourful wrapper and the half-eaten chocolate with the rich jelly centre.
I printed off an image I was happy with both in colour and in black and white to help with the light and shade areas.
I sketched out the shape of the wrapper and the chocolate adding a little more detail than I usually would, as I wanted to plot out some of the shapes of the light and shadow in the wrapper.
The SAA Acrylic Practice Paper has a fine linen texture similar to a canvas, adding to the texture of the work. With a silky matt finish, it is a perfect surface for practising rather than using canvases. It is sturdy enough to take the paint fairly wet without bucking.
With plenty of White a wet background what painted on to the background and a tiny touch of the Phthalo Blue Red Shade the colour was softly blended.
Alizarin Crimson was the perfect colour for the wrapper and White meant that I could look at the various tones and shapes that the light made on the shiny wrapper, I looked at the mid tones first as I could add the dark and light areas at the end. The mid tones varied from light tones to neat Alizarin Crimson. The colour is transparent which is perfect for glazing – adding another thin layer over another and the colour underneath will still show through.
Normally I produce quick pieces of work so it was a different pace to take time looking at all the different shapes and tones in the wrapper, I looked for simple shapes, often squares, rectangles and triangles of light and dark.
I darkened the Alizarin Crimson with a little Phthalo Blue Red Shade for the darker areas and neat White was added at the end to enhance the shine.
 A light wash of Alizarin Crimson was applied to the jelly centre and Raw Umber with a little Naphthol Red Light and a touch of Yellow Ochre was applied for the Chocolate.
Gradually adding and building up the tones.
As this was quite a long session toward the end, I was getting a little lost and could feel that I was beginning to faff rather than enhance. So, it was time to walk away and resume on another day. This is always a useful thing to do as you return with fresh eyes and a more focused approach. Adding shadow, extra highlights and re-evaluation of colour and tone.
Why not had ago at your own favourite chocolate to celebrate International Chocolate day
Happy Painting
Anita