
I have worked this piece on textured white Canson Pastel Paper using Derwent Coloursoft coloured pencils. Smooth paper is the usual choice for coloured pencils, but I am going to show you how the paper texture can add to a piece and how you can blend your pencils into a smooth united surface through multiple layering.
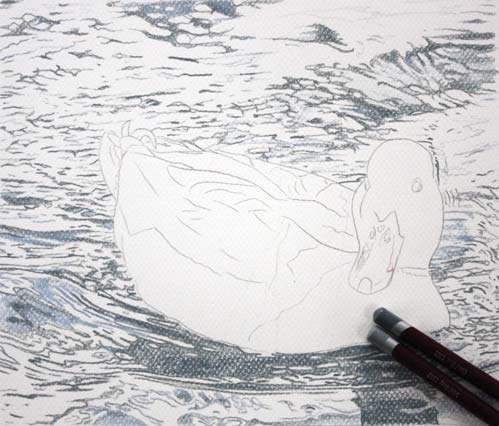 If you prefer to draw your composition by eye, draw out on a thin sheet of practice paper so that any mistakes and corrections don’t disturb the surface of your ‘best’ paper (showing later as indented lines or greasy rubber smudges). It is a complex image, so if you do not feel your drawing skills are up to the challenge, think about gridding the image. Once you have established your structure, use Tracedown paper to transfer the image to your best paper then gently erase the graphite lines to leave a soft ghost image so the graphite does not taint your pencil layers. Next, start to fill in water ripples using a combination of Cloud Blue and Steel Grey, work lightly initially then vary the pressure to create darker tones of the same colour. Allow the paper texture to peep through as we will blend these areas later.
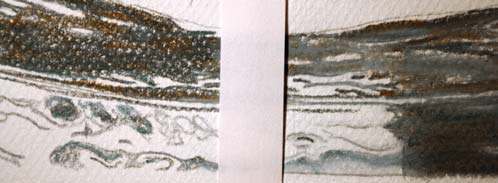 Add depth to the ripple shapes by layering in softly Pale Brown, Grey Green and Grey Lavender then use a colourless blending pencil to flatten and merge the layers together, pushing out the paper texture with medium pressure. If you don’t have a blending pencil, simply substitute a white pencil and press firmly in small continuous oval strokes (you can go over the bare white paper also if you wish). Take your time over this task and consider the hard and soft edges of the ripples.
 Build more depth into the foreground reflection and ripples (the darkest tones are in the foreground), add soft layers of Dark Brown, Lichen Green and Black, take care not to go too dark as you can always add more later.
 Duck body, light to mid tones: add a soft base layer of White over the lightest areas of the duck, this will give a soft undercoat for the Grey Lavender, Pale Lavender, Ochre, Pale Brown, Steel Grey and Cloud Blue. Work in soft layers of colours with light pressure and allow some accent strokes to help define the feather structure.
 Mid to dark tones: using the Dark Terracotta, Pale Brown, Loganberry and Dark Brown, add the mid to dark tones through the breast and wings paying attention to when the colours change from warm to cool (we will be adding a soft black layer later for depth, so don’t work too heavily at this point). Next blend these layers together using the Cloud Blue and Pale Lavender until the surface becomes smooth.
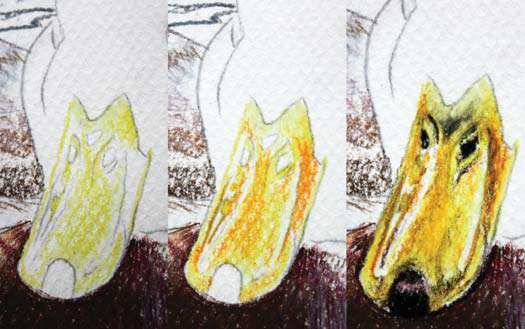 Beak: Work light to dark starting by putting in the White highlights firmly and adding a soft white under-layer for the brightest yellows, then work through the colours to build the yellow tones on the beak: Lemon Sorbet, Acid Yellow, Ochre, Pale Orange, Pale Brown, Dark Brown then Black. I added the Lemon Sorbet again over the beak to blend the colours. Add a little Grey Lavender mid way on the beak base before working up to and around with the Black to create a soft highlight.
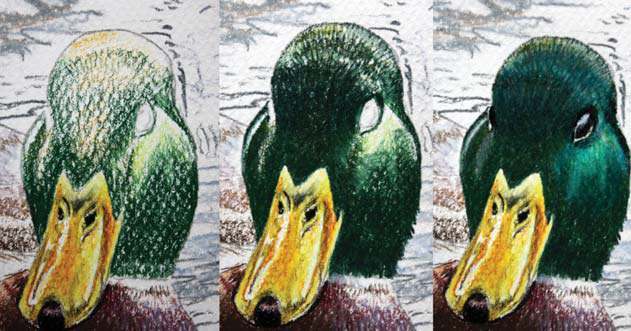 Head: Again working light to dark, place a White under-layer into the highlights (eye rim, top of head, light on eye surface and cheek), I added a blush of Orange to the top of the head then softly layered Light Green, Mid Green, Sea Green and Pine, creating texture accents by using small directional strokes over the crown of the head. I used the Pale Lavender and Sea Green to blend the under-layers before accenting the head and eye with the Black. Take care to reserve the highlights in the eyes and add darker accents of feather detail into the layered colours – keep your pencil sharp and use more pressure to give clean marks.
 Adding depth over the whole: continue using the Black over the breast, neck and into the areas either side of the waterline, again add a few accents with a sharp point and if needed, darken the shadow reflection even further. You will still have the paper texture showing through the main parts of the duck’s body, so you have two options; allow the paper texture to add to the feather textures, or blend further using the Cloud Blue, White and Pale Lavender to smooth these layers together.
