
It’s a scene many of us know too well. You’ve spent hours and hours working on your latest drawing and it’s finally finished! It’s possibly your best yet! The colours are bright and vivid, the drawing is crisp and detailed, you’re really excited to share your work online with your friends and in your favourite groups……. But then it all goes horribly wrong! Your photos make your drawing or painting look dull; the colours muddy; the details are all but gone! Would you like to be able to accurately photograph your artwork to show it off to its best potential? Read on to find out how.
 There are a few things to consider when you want to photograph your artwork, and light is arguably the most important. You might not realise it, but the light comes in many colours and where or how you take your photo can mean that these colours can affect how your work looks in a photograph. The best option is to take your photograph under daylight or “white” lights (see image 1 for more info in the “Indoor Photography” section below).
However, for most of us that don’t have access to this equipment, taking it outside on an overcast day can also give excellent results. If you’re blessed with a sunny day when you’re taking your photos, try to aim for a place in a solid shadow (not under trees!). It’s best to avoid evening and early morning when the sun can have a red/yellow hue. Try to also avoid taking your photograph indoors using artificial lighting (unless you’re using daylight lamps or white-balanced lighting).
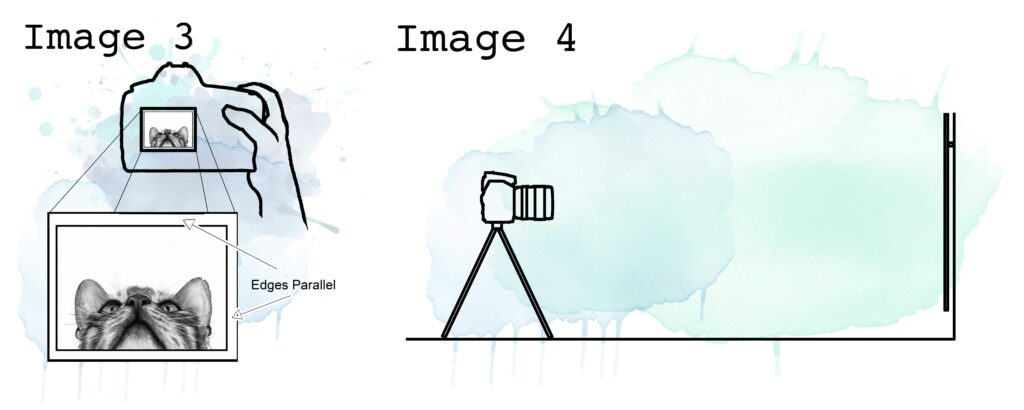
 If you photograph your artwork straight on, it will stop you from getting a distorted image in your photo. Try to place your drawing facing directly towards the camera so that the flat plane of your work is parallel to the lens of your camera. Laying your work flat and taking the photo from an angle above will lead to problems with perspective and your work will not look “square” in the final photo (image 2). You can check if your artwork is square to the camera by making sure the edges of the drawing are parallel to the outside frame of the photograph (image 3). Try to fill as much of the frame of your photo with your work. Hanging your artwork on a wall at eye level is an ideal solution for this problem, assuming the lighting is ok around you (image 4).
 In a perfect world, set up two large white-balanced light sources (flash is best) with a softbox or photography umbrella in front of them to diffuse the light. Place them at an equal distance from your work at a 45-degree angle (image 1). If you have lights but no softbox or photography umbrellas, you can also hang white sheets between the lights and your work to diffuse the light. Avoid tungsten bulbs, fluorescent tubes or coloured lights unless you are familiar with changing your camera’s colour balance settings! Also check your environment for large, coloured areas (floors, walls, ceilings etc.) as the colour from these can be reflected onto your work and therefore distorting the colours of your final photograph.
If you only have one light source (a camera flash, perhaps?) try to set this so that it bounces off a large white area (a white ceiling is ideal). When doing this, position your work so that it is facing towards the surface where the light will be bounced off as much as possible.
If you are taking your photographs indoors, in low light or find it difficult to keep your hands very still then use a tripod when photographing your work. If you don’t have a tripod, you can improvise by propping your camera up on some books or a pillow then either pressing the shutter very carefully or, even better, by using a timer to delay taking the photo until you’re not touching the camera. This will help photograph your artwork massively!
 If you are aiming to print your work to create giclee prints, cards etc then you should aim for a resolution of 300dpi (dots per inch). This is the industry standard resolution for prints (including giclee) and will ensure you don’t end up with a spotty, pixelated image. Image 5 shows print sizes (in inches) that are possible at 300 dpi when using various camera resolutions. For example, if your camera has a 12-megapixel resolution (12MP) the largest size you can print at 300dpi (before cropping your image) is 14.25 x 9.25 inches and any prints larger than this risk losing quality and becoming pixelated.
If you have a camera with a zoom lens try, where possible, to take your photo on a setting between 50mm and 100mm using a physical zoom, as this will give the most accurate image with the least distortion. Wide-angle lenses, particularly, will “bend” straight lines meaning your final work may not look accurate in the photo. Some digital cameras (and mobile phones) use “digital zoom”; you should avoid using this function like the plague! Physical zoom uses lenses to increase or decrease the size of the image but digital zoom does nothing other than crop the image smaller to make the subject look larger in the frame. The result of this is that you lose quality in your final photo.
If you’re feeling brave you (and know a little about photography!) you can improve the outcome of your images by making sure you are using the correct settings on your camera. ISO, aperture and shutter speed all work together to give you your final exposure but how much you can change these settings will depend a little on the light you have available. If possible you should use the lowest ISO you can (ideally 100 ISO) as this will ensure you get clear, crisp, bright and well-saturated images.
The aperture (f-stop) of your lens will change how much light is let through the lens by making the opening larger or smaller but also affects the sharpness of your image. The higher the number, the smaller the hole (so the less light will come through) but more detail will be sharp. When photographing artwork you should aim for an aperture between f8 and f11. Using these settings may well give you a really slow shutter speed (unless you are using flash) which means that a tripod is essential! It’s best practice to use a tripod and have a timer set for your shutter release if possible.
I hope this brief guide has helped give you some ideas about photographing your own work, if you would like to find out more there is a plethora of information available online or taking a basic course in photography would help you understand the basics of your camera settings. Good luck!
This article was originally published in our Professional Resources Hub, just one of the many benefits of an SAA Professional Membership.
 For more information on Becky Gouverneur and her work, visit: bexartsuk.wordpress.com