Using mixed media is great as you learn to use a variety of materials to help you to achieve the desired effect without being restricted to one medium. I like my paintings to wash away around the edges, so the only detail is right in the centre, and this is possible by allowing the Brusho or ink to run down the paper. One of the great things about Brusho is that it is inexpensive and therefore perfect for experimenting with.
 Firstly, draw out your subject in a simple line drawing. Use an HB pencil quite heavily as you will need to be able to see it through the Scarlet Brusho.
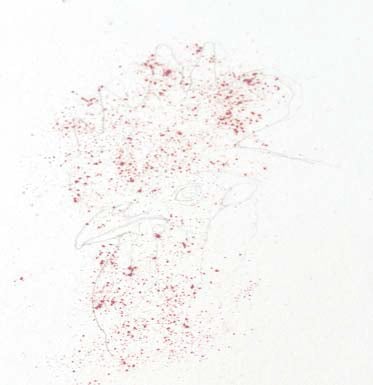 Next sprinkle dry Brusho onto the comb and wattle areas of the cockerel. Be sparing, too much will flood your paper with colour!
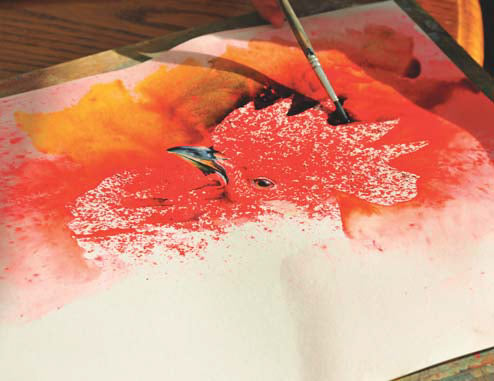
 Now use your water spray bottle to spray lightly over the Brusho. You want to achieve the mottled red and white look that you can see here. If you spray too much you will simply end up with a red sheet of paper, spray too little and you will have undissolved Brusho. Practise on a spare sheet of paper to get the amount just right. Spray the comb in an upwards direction then turn the paper around and spray the wattle in a downwards direction, away from the cockerel’s face. Allow this to dry naturally.
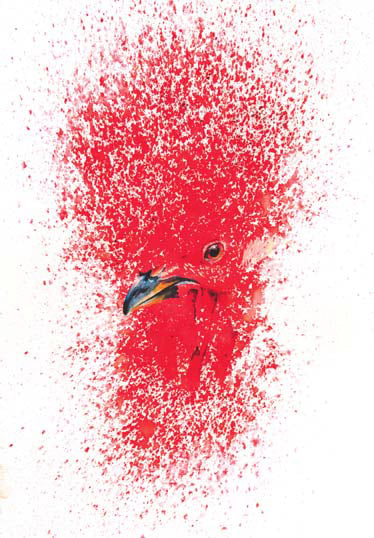 Now use your inks to carefully paint the detail in the face. Use a mix of Vivid Red Orange and Prussian Blue to create the shadows around the eye and under the face. Use Yellow Orange Azo and Vivid Red Orange for the eye (if the whole eye area has ended up red simply under-paint it first with Titanium White acrylic and allow it to dry) and Carbon Black for the pupil. Then use Prussian Blue, Titanium White and Yellow Orange Azo for the beak, darkened with a little Carbon Black and highlighted with White acrylic. Once the face and wattle are painted move to the next step.
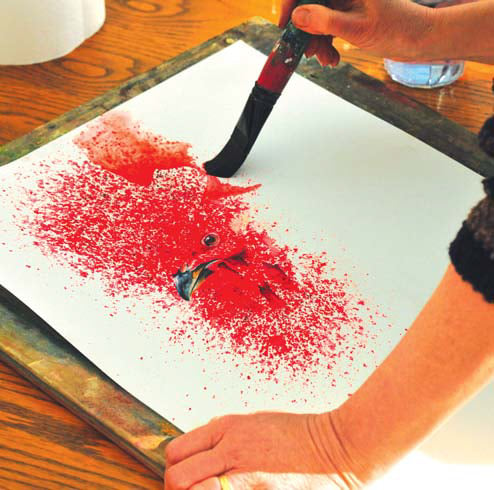 Carefully re-wet the outline of the cockerel with the smaller brush and then with the wide Flat or Mop brush wet the paper all the way to the edges. The Brusho will re-dissolve making a red background.
 Now drop some inks (using the dropper in the bottle) close to the outline and allow it to fuse and run out to the edges of the picture helping it a bit with the larger brush. If you keep the whole cockerel shape dry none of the ink should enter the dry area. Try tilting your paper to make the ink run into interesting shapes. Don’t try and smooth everything out, cauliflowers and shapes in the background are lovely! I used a Yellow Orange around the beak, Sap Green Permanent around the comb and Prussian Blue (diluted) around the back of the head and body. Allow everything to dry naturally.
 Finish your painting by using Titanium White acrylic ink and / or acrylic paint to paint the body feathers (I have just suggested them and left the blue and red background showing through) and the earlobe, allowing the scarlet Brusho to mottle the earlobe. The Brusho has created a fabulous effect on the comb and wattle which really brings this picture to life!
This technique is brilliant for flowers. Simply sprinkle Brusho onto damp paper and spray lightly, or try sprinkling it onto almost dry background colours to give a mottled colour effect. The only limit is your imagination!