Having always painted photo realistic images for advertising and publishing, I now prefer to use a simpler approach to my painting, avoiding getting bogged down with detail, especially at the start of a composition. I enjoy painting street scenes as they exude atmosphere and life and, cropped in unusual ways, can give a dramatic feel, lending themselves to this graphic, almost abstract approach
The versatility of Winsor & Newton Professional Acrylics makes them ideal for this type of work. Available in translucent and opaque colours, they can be used without having to mix with water and dry very hard, giving you the freedom to build texture, dry brush or create a softer feathered finish. This was painted on the Winsor & Newton Deep Edge Cotton Canvas which I thoroughly enjoyed using. The surface was firm and tight thanks to the innovative pro-stretcher device, and the texture had a nice bite taking the paint well.
1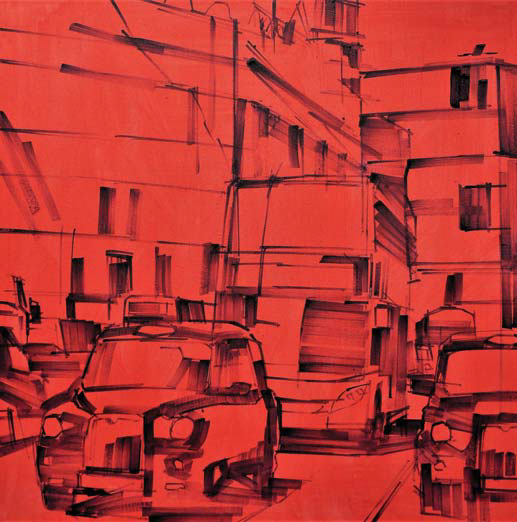 The first step is to paint a light wash over the pristine white canvas. I usually use a bright orangey red, but it can be any bright contrasting colour that will show through in places in the final painting. Once dry draw in your chosen image from a photo. I chose this one of South Kensington High Street as the contrasting tones will give the painting a strength. I tend to use a square rather than rectangular format as it adds a different quality. When roughly drawing (with a thin dark acrylic wash) look at the basic shapes of the shadows and the negative areas, avoiding the detail of windows and architecture. I concentrate on the main perspective lines of the buildings and traffic. The lights and windscreens on the taxis and bus are just ‘ticked’ in at this stage. With the same wash I then brush in the darker areas.
2 The colour goes in with broad sweeps of the brush creating a colour bleed which helps with the illusion of detail. I use a firmer haired brush and at this stage opt for my size 40 Flat with a thin edge. This stops the temptation to put in detail at the beginning stages. I now turn my canvas and my photo upside down as it encourages me to keep my strokes loose as well as helping me to view the light and shade areas as simple shapes. I never use a palette to mix my paints, preferring to charge the brush with three to four dabs of colour straight from the tubes! I block in with a mixture of firm and soft strokes of colour to completely cover the canvas. There is no need to clean the brush out during this stage – just wipe away any unwanted colour. You will find that the background colour is still there in random places. If you want your paint to slide more easily you can use a little ordinary fabric conditioner! It is very important to leave this stage to dry thoroughly. If you carry on painting onto drying paint, it will become sticky and the colour muddy and you will loose all the strokes you have already made.
3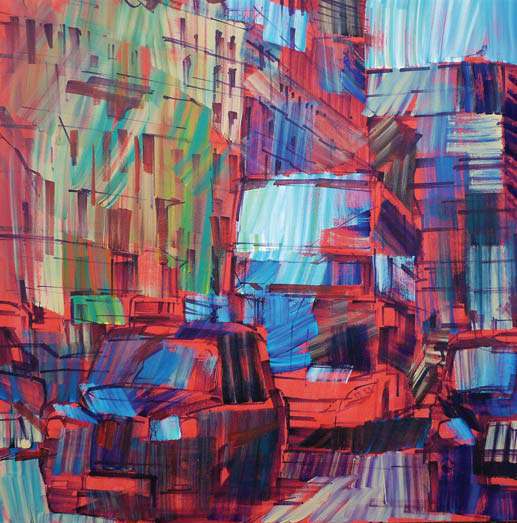 After about ten minutes it will be dry enough to push on to the next stage. Put all the tops on your paints and put them aside, you will need them again later. Place the work the right way up and mix a thicker version of your original dark wash (washing up liquid strength). Using a ruler proceed to loosely put in just the key lines of your image to define some detail – don’t be tempted to outline everything. Try to make the lines interesting as it helps to give the right look. I then add some windows to the buildings using a ruler and single strokes of darker paint – just to give an idea of windows and the shadows around them – but I avoid counting or outlining them. I also hint at some of the architectural detail that stands out.
4 After another short break for drying, it is time to add some detail to bring the scene to life. I turn the painting back upside down again to make it easier to see the lights and tones. Don’t overdo the detail – just add enough to provide a bit more information for the viewer. At this stage I change my brush to a selection of smaller flat or round ones, using a one stroke style and dabbing two or three colours on the brush at a time. I paint in a tighter manner more or less up to the key lines, leaving some of them showing. Painting in single strokes will stop you from creating flat areas of colour. I concentrate on the details of the bus and taxi’s headlights and windscreen to define them more. The highlight on the side and a small flick on the hubcaps of the taxi is all I need to do to make the image come to life. I then turn the canvas back the right way and step back and have a good look for any changes that are needed. I then leave it to dry overnight before having another look and adding the final touches.
5 This is the polishing off stage. It is important to take the time to look at your work again and check that all is right by lining objects up in relation to others like the taxi and the bus. I put in a few more lines with the bright green, and added the highlights in the office windows, bus and taxi.