
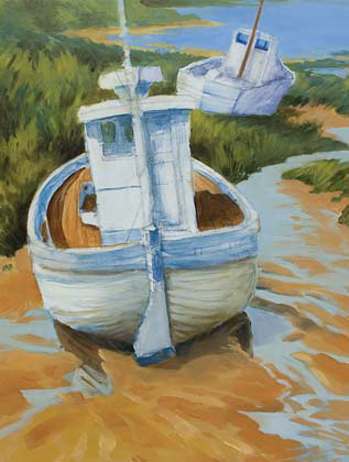
 I drew the boats directly from the photograph using a 2B pencil, exaggerating their angles, leaning them away from each other and overlapping them for a more dynamic composition. The background, mud and vegetation were loosely sketched.
I then used just four colours (Cadmium Yellow Medium, Cadmium Red Dark, Yellow Ochre and French Ultramarine) plus Titanium White to produce an under-painting. The colour mixes were approximate as they will be over-painted later. I used thin mixes which dry quicker and leave pencil marks showing. You can use acrylics for the under-painting to speed drying times if you choose.
 Once satisfied with the background, I used thinned French Ultramarine, with a touch of Cadmium Red Dark to paint the main shadows on the boats. This gave the whole thing a feeling of three dimensions. The completed under-painting was then left to dry fully for a day or so.
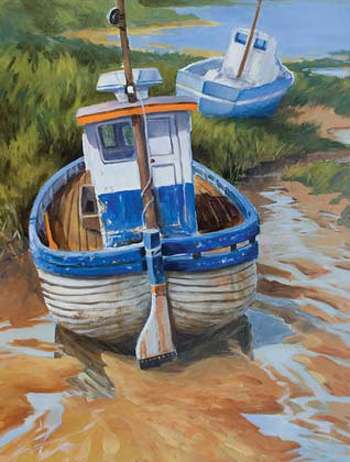
 Once dry I began to work on the main areas, starting with the background and vegetation. Keep plenty of tissues handy – frequently wiping the brush stops the colours going muddy. I mixed my own greens using various combinations of French Ultramarine and Cadmium Yellow Medium adding Yellow Ochre or Burnt Sienna to control their intensity and tone. Cadmium Yellow Medium mixed with Titanium White lightened the greens but I used white on its own for the furthest greens. White is cool and it heightens the feeling of distance. After patching in the vegetation I used the thin edge of a flat brush to give them a more convincing texture, dragging the darks into the lights and vice versa.
 I next painted the runs and trickles of standing water over the sand under-painting. I mixed French Ultramarine with White and added a little Cadmium Red Dark and Yellow Ochre to get a light grayish-blue. Relying on my imagination I created some interesting patterns of water, ignoring the photograph.
 Once happy I began painting the sandy mud, deciding on a sandier look for this painting. I added other colours to vary the basic Yellow Ochre and White mix. French Ultramarine both greys and darkens it (cool), Cadmium Red Dark warms it and Burnt Sienna darkens it (warm). A variety of mixes of the above will add shape and texture to this area.
 With much of the painting wet, I decided to start the main boat by applying some shading to the hull and planking. I used a variety of mixes of White with Yellow Ochre and/or French Ultramarine to darken them. I then left the painting to dry for another day or so.
 Now I could work further on the main boat. The blue is a strong French Ultramarine which compliments the orange roof board. The orange is simply a mix of Cadmium Yellow Medium and Cadmium Red Light. All the darks, greys and lights were mixed using the same colours in the manner described above. I used mostly round brushes for this stage, although I did find suitably sized flats very useful for applying dry-brushed weathering on the hull and rudder. This stage and some work on the smaller boat took quite a while. I let the painting dry out again for another day or two.
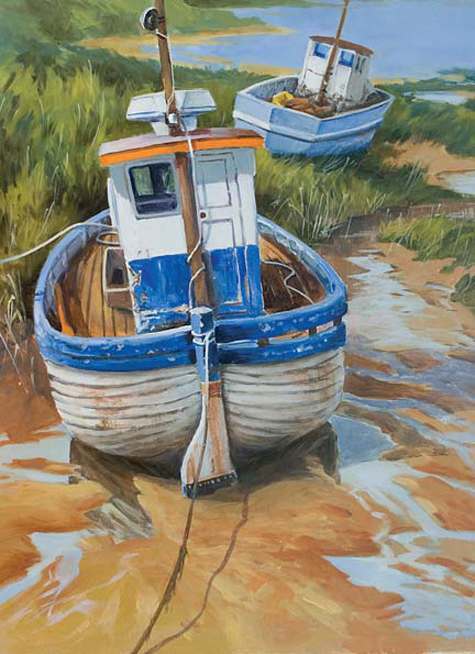 A little overall adjusting was called for, most notably the shadow under the boat roof needed lightening. However, with much of the painting now dry I turned to the Script Liner (rigger) to finish off. The mooring rope and shadow added interest to the foreground; the other ropes provided a convincing amount of detail. Finally, I added some light touches to the vegetation in the form of a few grasses.
The Artisan Oils work beautifully; the colours are rich and cover well. The ideal medium for working at home particularly if the smell of traditional oils is not popular in your household.