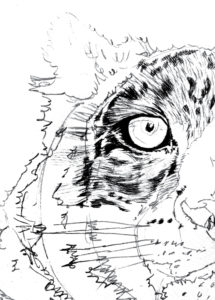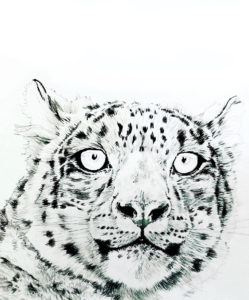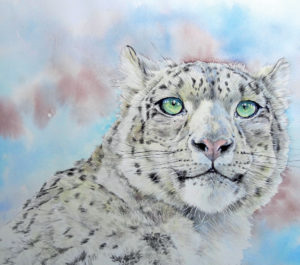
Fine detail and soft ink brush effects carried out in a considered manner can show form, depth and texture. Add to that soft watercolour washes and you have an attractive line and wash technique.
But before you start, it is important to consider paper type as we’re going to use quite a graphic line for the ink drawing. I’m using 200lb HP paper taped to a board. HP has a smoother surface which provides less ‘grip’ for paint and allows for a more natural flow, which was my desired effect for my painting of this beautiful snow leopard.
 Make sure your drawing is accurately observed. Careful observation of the reference photograph is vital. Start by looking at shape and contour. Begin with a rough circle for the head, then divide through the middle – slightly more to the right because the head is turned – straight through the forehead, nose and chin. Then do the same for the eyes. If you measure, the eyes are about quarter of the overall length of the face and the nose about halfway. You should then be able to plot the remaining shapes with some careful measuring.
 When you have the overall shape down, you can then adjust and add more detail like the markings and direction of fur. Now prepare two pots of ink, one watered down a little whilst the other should be quite weak.
 I’m using a small Chinese brush which I’ve pinched at the ferrule (where the hairs and the handle meet) to spread the hairs like a little fan. Using the brush like this means you can paint multiple hairs with one stroke of the brush, quickly capturing essential marks and fur. Really consider the marks you’re making, paying particular attention to direction; you want to follow the line of the fur. Keep the ink light in places, and vary the thickness of line. It’s a good idea to start with the eye, then put in markings around the eye, then a few fine pale lines in-between markings for general fur. Don’t let the ink dry on your brushes; remember Indian ink is permanent, so consider the marks you make carefully. Have some spare paper handy to try out the strength of ink.
 Consider the length of the stroke: paint longer strokes on the chin and bottom of the jaw for instance, shorter strokes on the nose and medium strokes on the forehead. Try not to take your eye off the photo for too long; you’ll instinctively start improvising if you do and might not be happy with the result. Where the fur is lightest, keep those areas almost white. Here and there add darker marks with a brush pen, around the eyes, nose, mouth and darker areas. If you haven’t used these pens before, practice first to get the feel. They are ideal for graphic line but not too easy to control and very sensitive to pressure!
 Now your drawing is complete, and your ink line is dry, you can add some colour with watercolour washes. A fairly detailed ink drawing like this won’t need lots, and it’s best to use a limited palette. Starting with the eyes, lay a pale wash of Lemon Yellow then add a little Green Gold whilst wet. When you’re waiting for that to dry, paint the nose in a pale wash of Alizarin Crimson. When the first washes are dry, add gentle washes of Phthalo Blue and touches of Ultramarine for the eyes and around the nose. Now paint very pale washes of Naples Yellow for the fur. You want to keep these washes fairly light as a snow leopard’s coat doesn’t have a lot of colour and you want your ink lines to show through the wash. Gently build up in different strengths for different areas, just a hint in places with a medium soft brush. I used a Size 6 Squirrel Mop. As you go, add a few darker tones with a little Neutral Tint and Caput Mortem, adding shadow mainly to the right side of the face with a little Cobalt Blue and a mix of Ultramarine and Alizarin Crimson. Keep everything simple. You don’t have to fill in using a painting by numbers’ style; just a flash of colour will say more than adding too much detail.
 Damp the background with a large brush and clean water, then add areas of Phthalo Blue, Cobalt and Caput Mortem, keeping a ‘rough’ edge to suggest fur. Finally, when dry, finish off with the Pentel brush pen for darker whiskers, and a thin brush like a Rigger and white gouache to paint lighter whiskers.