
Jane Betteridge is lucky enough to live near several bluebell woods and has a particular favourite which entices her back each year to photograph and sketch.
“On my visits to the woods, before I know it I’m mixing my paints, away in a world of my own, starting a new interpretation of an old favourite subject. The time can catch up with me, and as the light fades I have to pack up and return to my studio to complete the work, usually that same evening while I am still enthused working from my photographs and sketches.”
Shop Winsor and Newton Professional Watercolour
 Draw a simple composition of roughly five silver birch tree trunks, and mask them out. Whilst waiting for the masking fluid to dry, prepare the following colours to the consistency of single cream: Cobalt Blue, Cobalt Violet, Olive Green, Indigo and a very weak Winsor Yellow. When you are sure that the masking fluid is completely dry, gently roughen the sides of the trees, here and there, so that their trunks are not perfectly smooth, giving a more realistic effect when the masking is removed. Wet the paper all over with Whopper brush and drop in the colours, using the No.16 brush, starting with the Winsor Yellow which needs to be in the centre and towards the top of the paper for the distant light when the painting is finished. Then add some Cobalt Blue just below the Winsor Yellow, this will bleed upwards and turn green in parts, which is fine. Underneath that place the Cobalt Violet letting the colours merge, finally add more Cobalt Blue towards the bottom.
 Whilst your paper is still nice and wet, add some Olive Green at the top, around the sides and at the bottom, then do the same with the Indigo. Your paper should be wet enough for all the colours to merge together. At this stage also spatter some Cobalt Blue and Cobalt Violet over the foreground and up to the horizon level, plus a little Olive Green here and there to add to the bluebell effect. Then, just when the paint is beginning to dry and the shine is going off the paper, liberally sprinkle salt all over and leave to dry.
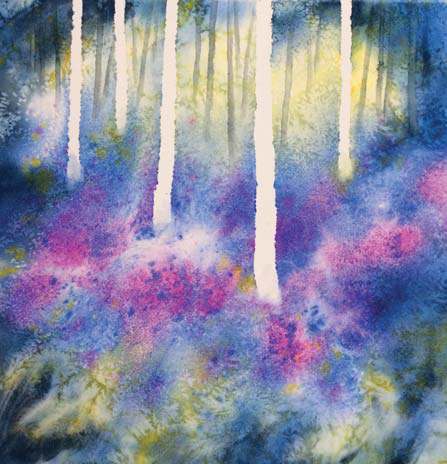 When completely dry, brush off any remaining salt to reveal interesting marks and shapes suggesting sparkle and vegetation. Next add the distant trees using quite a weak grey mix of Cobalt Blue and Burnt Umber with a No.6 brush, varying their angles, shapes and sizes. Where trees meet the ground, gently soften their edges to blend them in. Dab the trunks with a tissue here and there to make them look like they are catching the light in places. When the distant trees are dry remove the masking fluid from the main trees by gently rubbing with your finger or a rubber.
 The next stage is to dampen the main tree trunks with clean water and with a slightly stronger mix of the Cobalt Blue and Burnt Umber, paint in the left-hand side of the trunks, letting it seep over to the right, giving a natural sunlit look to the trees. When dry, strengthen the mix even more and add further marks to the trunks by using a No.6 brush and holding it flat to the paper, gently catching the top of the paper to give a textured look.
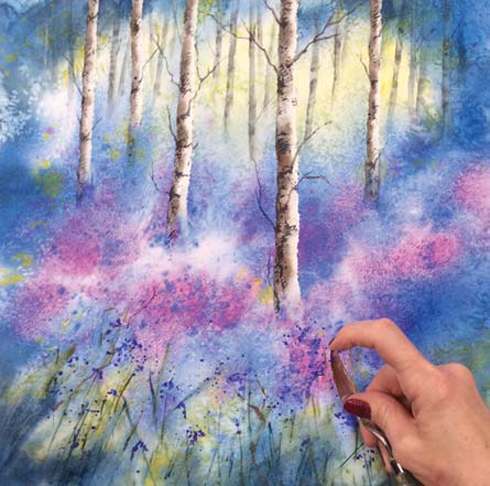 Using a fine Rigger brush, paint in some small branches sprouting out from the parts of the trunks created in stage 4. Next, in the foreground, using the Rigger with the Indigo and Olive Green paint, suggest some grasses and a few branch marks nearly up to the lowest main tree. This can be varied by adding leaf shapes, berries or anything you like. Now using the Cobalt Blue and Cobalt Violet spatter to indicate some of the bluebells. The best way to do this is with a palette knife upside down.
 Add a little bit of spattering and grass marks around the bases of the main tree trunks to make them look as though they are growing out of the ground, rather than just placed there. To finish off, using White acrylic ink and a rigger brush, paint some cow parsley in the foreground and a suggestion of some around the base of one or two trees and spatter a little here and there to give movement – but be careful not to overdo it.
