
Join Jeremy Ford as he demonstrates how to capture a stunning sunset in pastel

These are the colours Jeremy used, but feel free to adapt them to suit those you have available.
I used Pastelmat white paper for this demonstration, but any Pastelmat coloured paper will do as long as it’s all thoroughly covered in pastel. I used Unison Colour Soft Pastels, and a black chalk pastel pencil for detail.
1 Draw a line across for the horizon, (not too dark) slightly less than half way up the paper. You may want to use a ruler for this. Underneath draw a slight diagonal, down from left to right. Under this draw the tide mark, down from left to right using a series of short-ish strokes.
2 Using a mid to light blue, cover the top half of the sky using the long side (rather than the tip) of the chalk pastel. Don’t worry about covering every bit of paper. Using a deeper, darker blue, go over the top part of that covered sky, leaving the previous blue below. If you want you could then put an even darker blue right at the top of the sky. Using a mid to light orange, cover the rest of the sky down to the horizon, again using the long side of the pastel. Then use a deeper orange immediately above the horizon. Use the first light-blue sky colour below the horizon to the tide mark, then a deeper blue on top up to the horizon. Using horizontal strokes, cover the bottom left corner up to the tide mark with a very dark blue and/or black. At this stage it won’t look like much but be patient!
3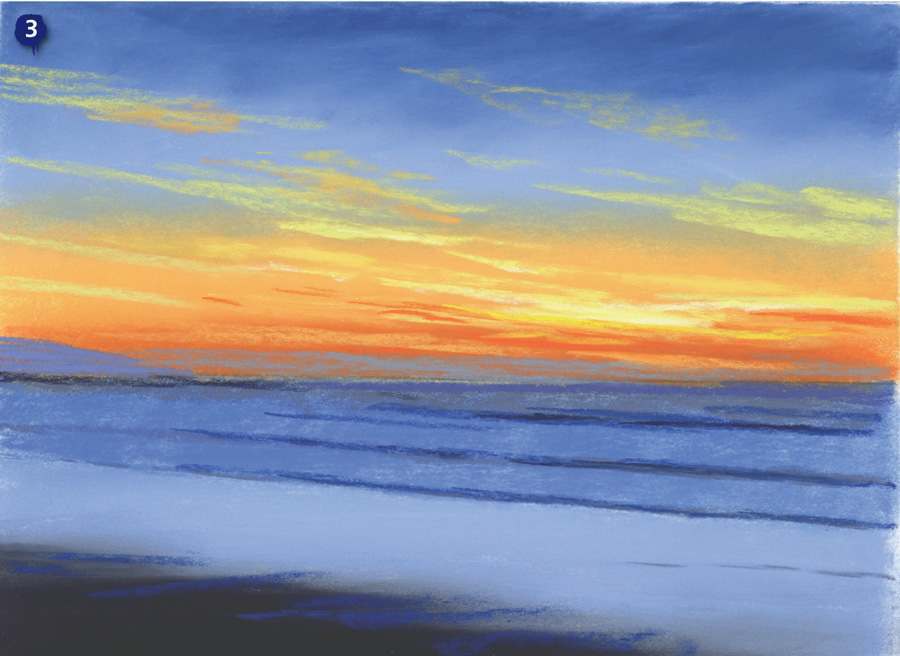 Before putting on any more pastel, use your finger to blend the colours into the paper. Work your finger in different directions filling in all the gaps, being careful to keep the sea from smudging up into the sky. It’s a good idea to use a different finger for pale colours, and another one for dark colours. If any parts are a bit patchy add some more pastel and continue to work it into the paper. If any colours appear too bright or vivid, put a light coat of white or cream over the top and blend in with your fingers, so lightening the picture. After all parts have been smoothed with the fingers, use a creamy yellow/orange for the clouds. Use the pastel sides for wider clouds and the tip for thinner clouds.
For even brighter clouds use a very light yellow, and maybe add a little white on top to add to the brilliance. Add a few deeper orange clouds near the horizon, and some blue-grey lightly over the low sky just above the horizon. Use deeper blues and/or greys for the shadowy edge of the waves and higher up towards the horizon. Add some blue bits in the foreground by the tide mark. Again, use your finger to blend the colours in a little. Some parts may need blending or softening more than others. If your finger is too big for a small area, try using a pastel shaper which is ideal for more careful blending.
4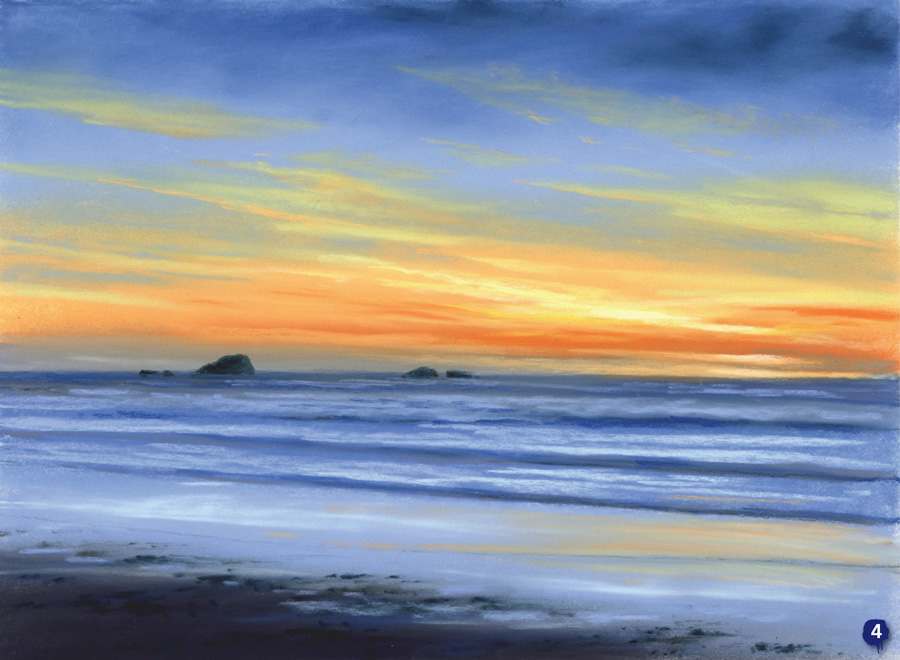 After the blending, add pale blue and even some white on the top of the waves and in the foreground. Add a little yellow/orange to the right of the foreground to reflect some of the sky. Add some more light to the lower sky just over the horizon. Put the islands in as carefully as you can, possibly using a black chalk pastel pencil if your pastel stick isn’t fine enough. Add some light and dark touches to the tide mark and soften slightly with your finger or a shaper. Stand back and admire. Time for a well deserved coffee!
 N.B. Pastel pictures are very vulnerable to accidental smudging, so if you decide to spray your picture with a pastel fixative, be very careful for the following reasons: Always use in a well ventilated area but don’t use if you have respiratory problems. Fixative can alter the look of the picture by making the colours more intense and vivid. Therefore spray carefully about 18″ away using a lightly applied layer then repeat after a few minutes. Test spray a sample on a piece of the same kind of paper first to see how it affects the pastel. If you decide not to fix, get it into a frame as soon as you can! I triple-mount my pastel pictures so that the first mount nearest to the picture (indicated by the grey dotted line) isn’t visible but forms a gap between the picture and the outer two mounts. This is so that if the picture is disturbed in the frame, any loose pastel dust will fall behind the outer two mounts, which are visible and also creates a good distance between the picture surface and the glass so there’s no chance of them touching.
Pastelmat is an excellent robust acid-free pastel paper made by Clairefontaine. I use it because it’s so easy to build up layers of pastel and keep working over previous layers without losing the “tooth” or grip that the paper has on the pastel. Some papers will only allow limited applications of pastel before they are no longer workable, whereas Pastelmat can be worked over and over without creating clouds of pastel dust! The pastel doesn’t move as much as on other papers but once you’re used to it, you can layer dark over light and light over dark again and again. It comes in eight shades (two different pads have four shades of three sheets) and each sheet has its own protective acid-free translucent paper cover to protect it.
As a pastellist who wants to be able to correct, re-work and build up a picture it’s a must for me. I thoroughly recommend it.