
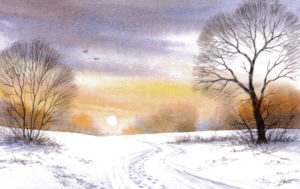
 Having drawn the composition with a B or HB pencil, I applied masking fluid over the sun. Mix plenty of Ultramarine with a small amount of Burnt Sienna, and add a very small touch of Vermilion to make a blue-grey colour for the top of the sky. Mix two oranges using the Vermilion and Cadmium Yellow; one with more yellow, the other with more red.
Mix background tree colours with Burnt Sienna, and add a darker brown by adding Ultramarine to Burnt Sienna. You can also use small amounts of the oranges and stronger sky grey as background tree colours!
Tip: Test these colours first on a piece of wet watercolour paper to gauge their strength. If they are too pale or weak, add more water. Remember the wetter your paper and the wetter your colours, the more they will run. I usually do a mini sky on a bit of paper in order to test the colours.
 Working at a gentle angle, wet the paper down to the horizon and brush in the blue-grey at the top of the picture, bringing a few streaks lower down.
Quickly wash the brush and apply some of the yellower-orange underneath and in-between the blue-grey. Quickly apply some of the redder-orange lower down the sky, and drop in the background tree colours before the sky dries.
If you want a silver lining to the lower sky area, use a damp (not wet!) fine flat brush to lift out some of the redder-orange.
NB: You may need to repeat this lifting-out if the wet sky keeps running back into the lifted area.
 Once this has dried, rub off the masking fluid. Dilute some of the orange with water and do the same with some of the blue-grey. Wet the snow area and apply the very pale orange at the top down to the middle of the snow, then carry on downwards with the blue-grey. You might need to stir up the two colours on the paper where they meet so they blend well together in the middle.
NB: The weak orange is barely noticeable so be careful you don’t have it too strong.
While the snow colours are still wet, lift out some of the colour with a fine flat brush to create the pale tracks. Use a small brush and not very wet pale blue-grey to paint the distant tracks, then allow to dry.
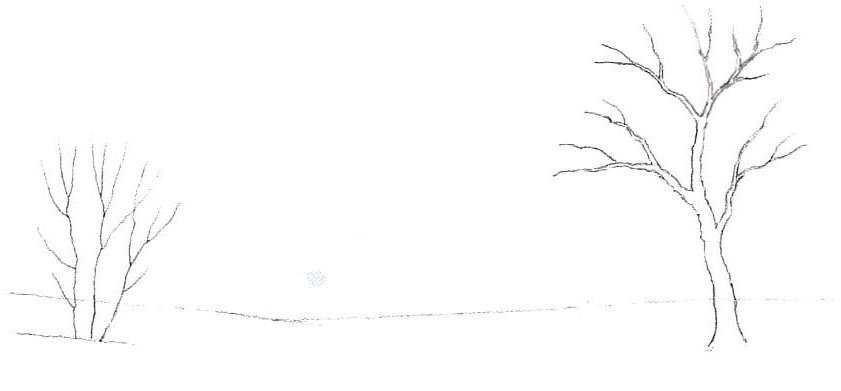
 Dampen the top of the snow to the right and apply some pale blue-grey down to the tree. Do the same behind the hedge on the left. Using a strong mixture of Burnt Sienna and Ultramarine, paint the fine branches and tree trunks with a fine sharp brush. Then use the SAA Rake Brush to paint the very fine mass of twigs beyond the fine branches. This is a very useful brush for winter trees and fine grasses. Paint in the hedges with a fine brush using stronger blue-greys and browns. Use an almost dry small brush to touch little areas of brown here and there in the snow each side of the track.
You can do this by getting rid of most of the colour on your brush onto some tissue so your brush is damp rather than wet.
Touch the whole body of the brush onto the paper rather than just the tip and it gives a broken effect like scrubby grass or earth.
Once this has dried paint shadows under the hedges and underneath the bits of grasses/earth with very pale blue-grey.
Paint more of this colour over some of the tracks and when dry, paint in the footsteps making sure they decrease in size further away. Finally add two wide V-shaped birds in dark brown with a fine brush.